Auto-signals Connector
What is the Auto Connector (MT2 AUTO FX)?
The Auto Connector is a MetaTrader 4/5 plugin which acts as a bridge between MetaTrader 4/5 and MT2Trading Platform.
Once loaded in a chart, the Auto Connector will read BUY or SELL signals from any MT4/MT5 technical indicator and place trades automatically on the user broker account, respecting the desired risk management parameters and overall trading strategy (which can be configured on MT2Trading platform)
While MetaTrader 4/5 allows for automated trading natively on the platform, the Auto Connector removes completely the need for a complex Expert Advisor (EA) in order to automate Forex trading signals, making it very simple and accessible for every user, regardless of their level of trading knowledge and expertise.
As the Auto Connector (FX) is a MetaTrader 4/5 plugin, the first step will be to install the MetaTrader 4/5 platform, if you haven’t done it before.
How to install MetaTrader?
MT2Trading platform comes with a built-in installer for installing Alpari MetaTrader 4/5 platform on the local computer very easily:
1. Click on the ‘MetaTrader’ drop-down menu on MT2Trading platform tool bar
2. Click on the ‘Install MetaTrader button’ and choose which MetaTrader instance you want to install by clicking on it.

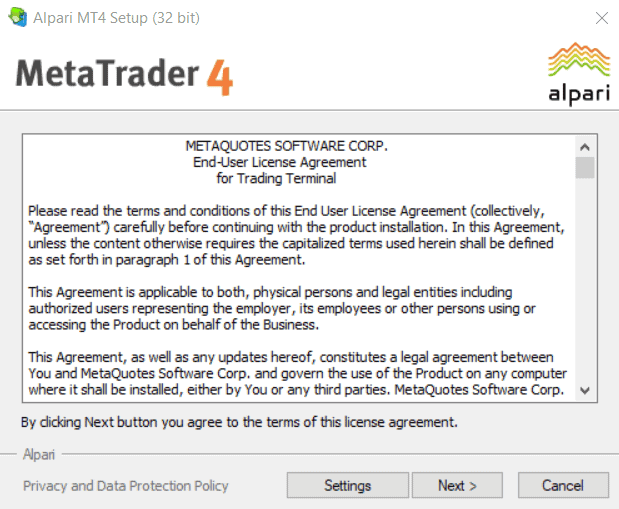
3. After clicking on your desired MT4/MT5 instance, the Alpari MetaTrader setup will pop-up. Just follow the installer until the platform has been successfully installed on your computer.
After successfully installing Alpari MetaTrader on your computer, the platform will automatically open and load.
How to open MetaTrader?
First of all you need to open a MetaTrader 4/5 instance on your computer. In order to do so, repeat the previous steps but instead of clicking on ‘Update Connectors/Plugins’ you should now click on ‘Run MetaTrader’.
1. Click on the ‘MetaTrader’ drop-down menu on MT2Trading
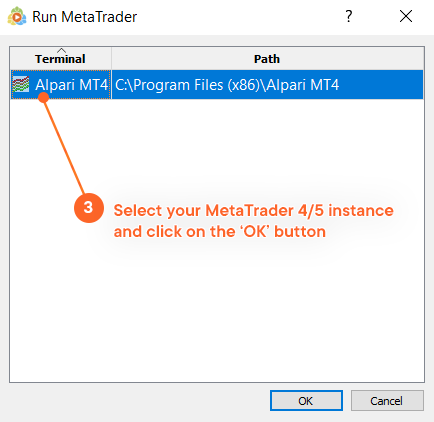
2. Click on the ‘Run MetaTrader’ button and a window will pop-up
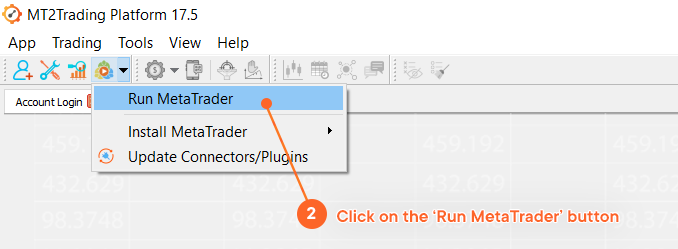
3. Select your MetaTrader 4/5 instance and click on the ‘OK’ button. The MetaTrader platform you selected should now open.
How to integrate the Auto Connector (FX) with MetaTrader?
MT2Trading platforms counts as well with a built-in installer for all the available connectors & plugins. Auto Connector (FX) can be found among these, so installing and loading in MT4/MT5 is very simple:
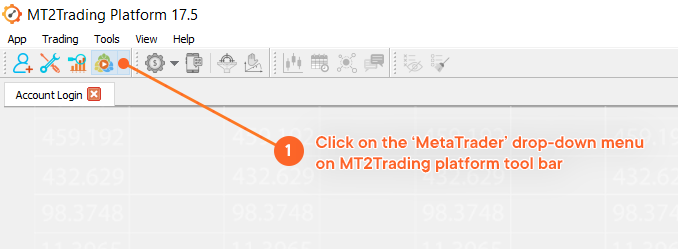
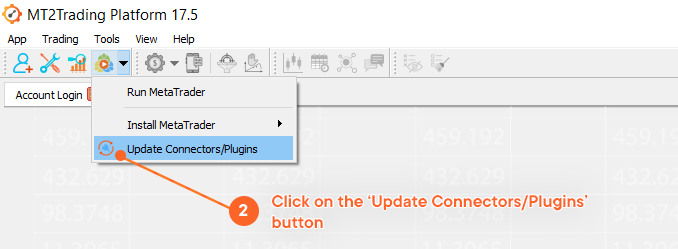
1. Click on the ‘MetaTrader’ drop-down menu on MT2Trading platform tool bar
2. Click on the ‘Update Connectors/Plugins’ button and a window will pop-up
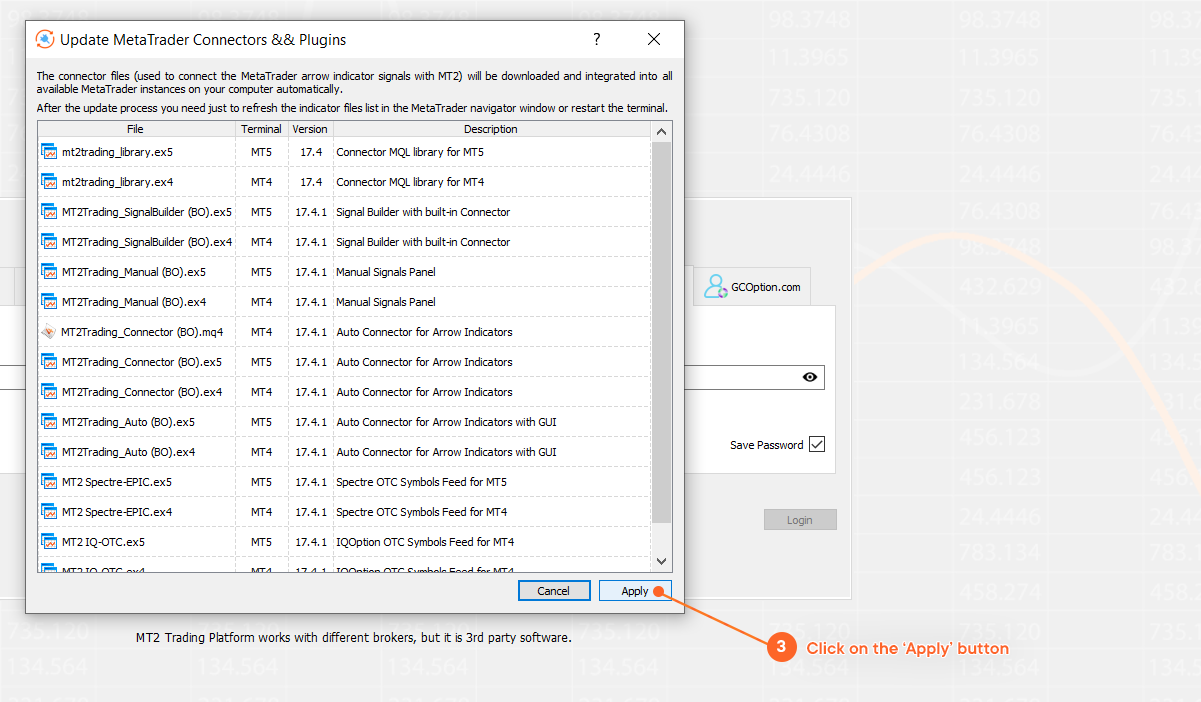
3. On the window you will see all the available plugin/connectors. By clicking on ‘Apply’ all of them will be downloaded on your pc and integrated to all the available MetaTrader instances on your PC.
How to load the Auto Connector (FX) on MetaTrader?
Once you have the connector file inside your MetaTrader folders, proceed to open it on a chart.
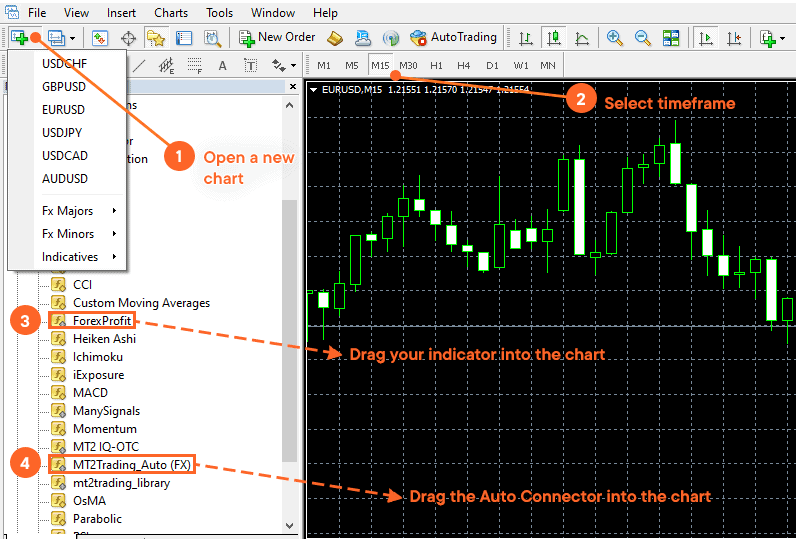
- Open a new chart and choose your desired timeframe
- Open the Navigator by pressing CTRL + N
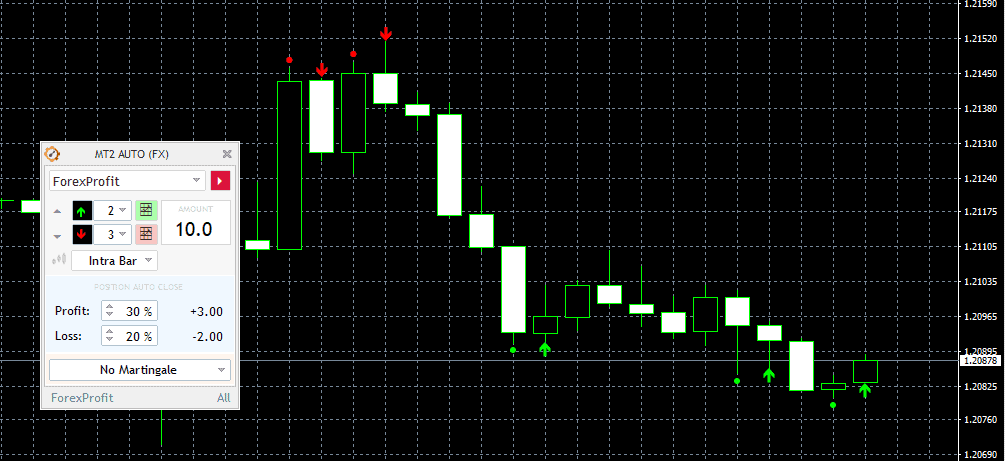
- Click to select and drag your signals indicator/template to the chart (in case you don’t have an indicator, we include inside the MT2 download files the “ForexProfit” indicator as a courtesy
- Click to select and drag the connector file “MT2Trading_Auto (FX)” to the chart
Once you drag the ‘Auto Connector’ file into the chart, the graphical user interface will open, where you will be able to customize different parameters.
Customizable parameters
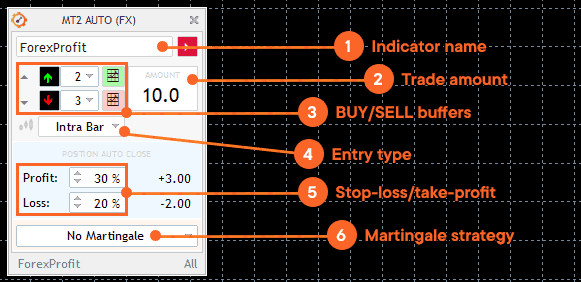
1. Indicator name
The name of the indicator is used to identify where the signals that will be placed in your account come from and to show their names on the trades table on MT2 Trading platform. The statistics and the historical data are also based and ordered according to the names of the signals you trade with.
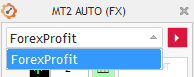
Once you drag the connector to your chart with an indicator, you just have to click on the little arrow on the side and all the indicators on your charts will appear there. In this case we will use the indicator “ForexProfit” as an example. Remember that you can use any indicator you want.
2. Trade amount
This parameter allows you to set the amount of money invested on each trade.
In the example, we can see that the amount is “10” which means that each trade that the robot opens will be of $10 USD.
![]()
If you want to change the amount of each operation, you should just modify this parameter.
For example: For $5 USD, you should write “5.0”. For $ 15 USD you should write “15.0”, and so on…
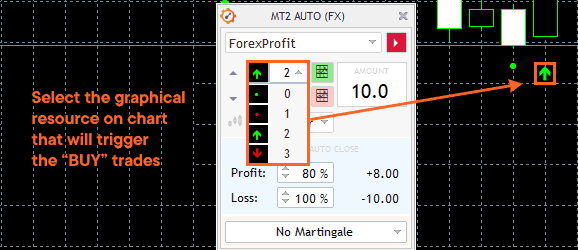
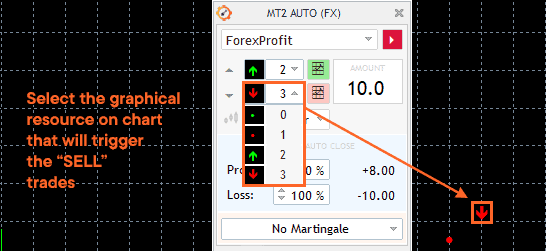
3. BUY/SELL buffers
Every MetaTrader indicator that generates signals in the form of arrows, points or other graphic signs, transmits the signal data in the so-called “indicator buffers”.
Once the Auto Connector identifies the signal indicator, it will automatically read the arrows or points it displays on the trading chart and give you the option of configuring the buffers for the robot to place BUY or SELL trades for you.
BUY buffer
In the “BUY” buffer you must select which graphic resource is the one that will indicate to the robot to open a BUY trade in your account. In this example, the Auto Connector will read the green arrows facing upwards on the chart as “BUY” signals, and will open “BUY” trades on the MT2Trading platform.
SELL buffer
In the “SELL” buffer you must select which graphic resource is the one that will indicate to the robot to open a SELL trade in your account. In this example, the Auto Connector will read the red arrows facing downwards on the chart as “SELL” signals, and will open “SELL” trades on the MT2Trading platform.
4. Entry Type
Once you have configured the signal buffers, you can choose between two types of entries: OnNewBar or Intrabar. Most reverse indicators generate signals to enter on the new bar, while trend indicators commonly generate signals for the intrabar entry.
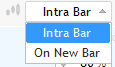
- On the new bar entry, the trade will be carried out at the end of the candle in which the robot received the signal (that is, at the opening of the new candle)
- On the intrabar entry, the trade will be opened immediately when the signal appears.
6. Take-profit/Stop-loss
Stop-loss (SL) and Take-profit (TP) parameters will allow you to define profit and loss targets for your trades. Once SL and TP are defined and you open a trade, it will stay open until either one of these parameters are reached. As soon as your desired profit or loss is reached, the trade will be automatically closed, and your capital safe and locked.

To define desired profit and loss parameters, you need to input a percentage (%) number on the “Profit” and “Loss” fields within the Auto Connector plugin. This percentage will be calculated over your investment amount (trade amount) and displayed to the right side of the profit/loss fields.
On this example, the profit is set at 30% and loss at 20% of the investment. As the investment amount is 10.oo, the profit target is +3.00, while the loss target is -2.00. In other words, the trade will remain open until it has achieved a profit of +3.00 (30% of 10.00) or a loss of -2.00 (20% of 10.00). The maximum allowed profit target is 1000%, while the maximum allowed loss target is 100%.
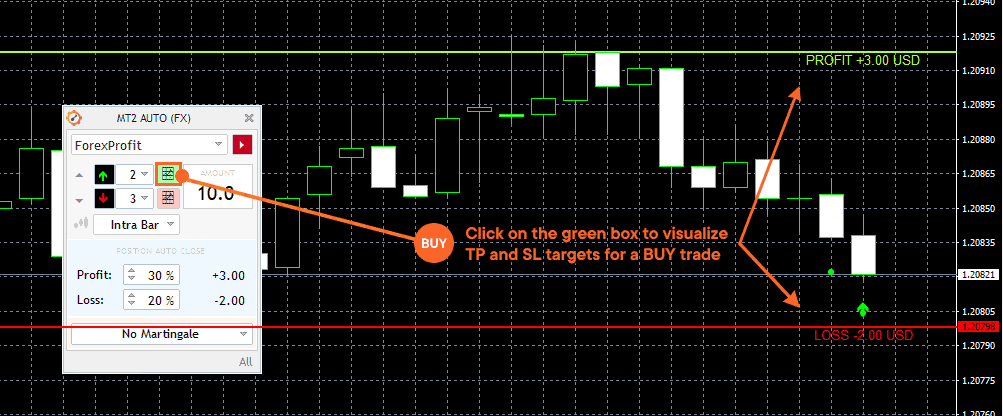
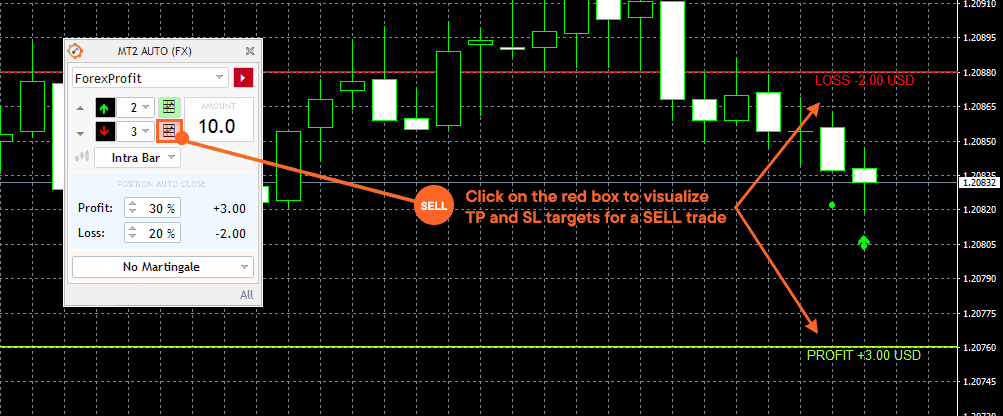
How to visualize the Take-profit and Stop-loss targets on the chart
Before defining profit and loss parameters, you might wanna check how they look visually on your market chart. To do so, you will need to click on the green and red boxes (![]() ) besides the BUY/SELL buffers.
) besides the BUY/SELL buffers.
The green box will display visually the TP and SL for a BUY trade:
The red box will display visually the TP and SL for a SELL trade:
7. Martingale
The idea of the Martingale strategy is to counteract the losses caused by lost trades. In standard Martingale, if you lose a trade, you re-enter with a greater trade amount, so that over time, a winning trade will compensate all the previous losses. This new trade amount is equivalent to the amount of the lost trade multiplied by a Martingale coefficient. It should be noted that Martingale strategy can be risky, so you will have to be very careful when setting it up.
By default the Martingale strategy is disabled.
To activate it click on the menu where it says “No Martingale” to choose your preferred option, and define Martigale steps and coefficient.
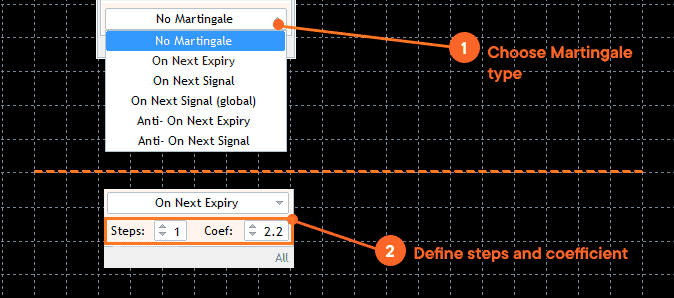
A. Martingale type
- “On the next expiration” (On next expiry): The martingale will be applied immediately after the close of the current trade.
- “On the next signal” (On next signal): The martingale will be applied on the next signal of the same currency pair.
- “Anti Martingala in the next expiracion” (Anti – on next expiry): Unlike in the conventional Martingale, the strategy applies to the operations won. When winning an operation, the robot will re-enter with an amount greater than that of the operation won, in the next expiration.
- “Anti Martingala in the next signal” (Anti – on next signal): When winning an operation, the robot will open the next one with an amount greater than the operation won, in the next signal.
B. Martingale Steps:
This parameter defines the length of the Martingale series.
By default, there are 2 steps. If you lose an operation, the first step of Martingale will be applied where you multiply the amount of your entry by the chosen coefficient. In case the first step of Martingale is also lost, the second and last step will be applied. If you lose the last step of Martingale, the step count is reset.
You can use as many steps as you wish to adjust your strategy, but remember that the greater number of steps, the greater the risk.
C. Martingale coefficient:
This parameter defines the multiplier of amount per trade in each step of Martingale.
For each lost trade, a new amount must be calculated to be applied in the next operation. Therefore, the amount of the last trade will be multiplied by the martingale coefficient.
In the example above, if the operation with an amount of $ 2 USD results in loss and we have a Martingale coefficient of 2, we will multiply $ 2 USD x 2 and the next step of Martingale will be $ 4 USD.
$ 2 USD x 2 = $ 4 USD.